A Portrait With A Dappled Background
by Nancy McCabe
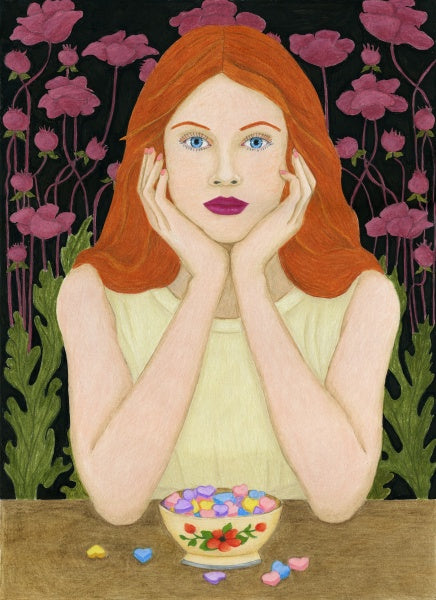
I love to draw all types of animals, in particular domestic animals, local wildlife and birds, but recently I started to explore human portraiture. “Solange” was my first human portrait in colour pencil, and I’d like to share with you how I created the background for this drawing. Of course, you can create similar effects using purely colour pencils, with or without a blending medium. I confess to being rather impatient and using this method on film, incorporating oil pastels and blending medium speeds up the process for me. I’m suggesting professional grade materials as I believe you will have the best results, especially in regard to quality of the pigmentation and ease of blending.

Solange 8"x10", portrait of a young girl on drafting film. The sun dappled background helps bring this portrait to life.
Once my line art is prepared and securely taped down on a smooth black mat board, a sheet of .005 matte 2 sides drafting film is taped over it. I tape on one side using low tack painter tape which lets me slip a clean sheet of paper behind the film to see how my drawing is progressing without the line art showing through. Taping on one side also lets me lift the film over to draw on the reverse if areas need more layers to create depth, or darken values. You can experiment on developing your backgrounds on a spare piece of drafting film, and placing it behind your drawing to allow you to judge how the finished piece will look, and make any adjustments accordingly.

Solange in progress. This image shows how the oil pastel is used to build up values and textures.
When preparing to begin a new colour pencil drawing on film which includes an abstract background, I like to preplan by checking the contrast between subject and background using a colour wheel. But, I’ll let my instincts take over at this point, and fine tune my colour selections to get the effect I’m happy with. I’m not necessarily trying to replicate the photograph as my primary focus is to create a complimentary background to make the subject stand out, and I’m not tied to the actual colours that may be present in the source photo. I add shapes, colours, values, and tones that I feel bring emotion and movement to the piece.

Solange, a side by side comparison. Drawing on the left, source photo on the right. This image demonstrates how the artist can change the background to achieve the results you want!
In the portrait of Solange, I didn’t start with the background as I might normally, but as I worked on her face I thought subtraction techniques on a dark background would best capture the sunlight on her hair, and decided to add the background. I selected fresh pastel colours in the lower grassy area to create summer warmth which also shows in her glowing face. I used odorless Turpenoid to create a blended base of light creams and yellowy greens. I like using blending fluid as I don’t have to press as hard to get the effect I want, but you may prefer trying blending stumps or a dry cloth or a bit of paper toweling to blend in the pastels. Using a blending medium makes the pastel translucent, and I find only the teeniest amount on a cotton bud is enough for me, and you can always add more. Once the base was dried on Solange’s background, I added splotches, squiggles, and circles of light greens, greys, creams, and yellows. I carefully blended those areas separately so they weren’t blended as one colour into the base layer, and dabbed and twisted a kneadable eraser around to lift off circles of lighter areas to create interest and textures. I adjusted values by retouching areas with more pastel layers and re-blending, or by adding colour pencil. When the dark areas of the upper background trees were complete, I drew in her hair and lifted out the textures and highlights in the hair with the kneadable eraser, Tombow Mono, and Slice tool for the wispy bits. I’ve found colour pencil blenders work beautifully on top of the blended pastel! As you are working on blending your colours be mindful of keeping your tools clean so you don’t muddy your colours by accident! A little twist on a bit of clean paper towel usually works.
In my opinion, in art, there’s no right or wrong way to achieve the results that satisfy you as an artist. And by realizing not everything you draw will be a masterpiece, you will create an opportunity to learn something from the attempt. Experimenting with different techniques can help grow your creativity, and perhaps you will have an “Aha!” moment of your own that helps you develop as an artist, to discover and push the boundaries of our favourite medium, colour pencils!
LIST OF MATERIALS
Drafting film or Dura-lar matte 2 sides, .005 weight
Various brands of Professional quality colour pencils
Professional quality oil pastels
Blending medium (I use Turpenoid odorless turpentine)
Blending stumps, paper toweling, cotton buds, colour pencil blending pencils
Kneadable erasers
Tombow Mono eraser
Slice tool
Colour wheel
NANCY MCCABE:
Nancy is a retired graphic designer who resides in Atlantic Canada with her husband Brian and their pets. Not having drawn or created art by hand for 30 years, January 2023 found her re-exploring different mediums, including colour pencils. In between portrait commissions, Nancy is inspired to create artwork that brings her joy. A lifelong nature observer, she is happiest in her flower and vegetable gardens, on local beaches and woods.
Facebook: Nancy McCabe Portraits and Fine Art