My Top Tips for Working in Coloured Pencil
by Michelle Farmer
I’ve always been a creative soul. As a child you could find me with a sketch pad, pencil, or paintbrush in my hands, out in the garden sketching tree bark or leaves. For many years, I took watercolour classes with many of my pieces proudly gracing the walls of our family home. In 2022, I took up coloured pencils and I’ve learned a lot since then, usually through trial and error! I thought it might be helpful to share some of my top tips for working in coloured pencil.
#1 The Ugly Duckling
I think this is one of the biggest things I’d say is, “Don’t give up when your drawing starts to look ugly”. It will, and it’s okay; we all go through it. Seriously, it’s a mental challenge but trust in the process and let the pencils do the work. You can put it away for a while, walk away if you have to, but come back to it and put pencil to paper again knowing it’ll all be okay. Coloured pencil is very forgiving.
Most often the cause is that there aren’t quite enough layers, so the work looks patchy. Depending on the surface you’re working on, some will take lots of layers, and others only a few so you’ll have to take care not to overwork the surface but otherwise just keep adding layers of pencil until all the white of the paper has disappeared and the piece starts to look more cohesive. There’s a beautiful swan just waiting to emerge; trust me.
“Don’t give up when your
drawing starts to look ugly”
#2 Set the Framework
In my professional life as a health and safety manager, having a properly set up workstation or desk is key to creating for the longer term, comfortably and without body stress. I started out on the dining table; I know others who still do. However, if you want to be able to be able to create into the future, you need to look after yourself now. Invest in the basic framework of your practice and set yourself up correctly.

My workstation with sit/stand desk, drawing board, ergonomic chair, footrest, and lighting
— Get a good, stable and height appropriate desk. I purchased a relatively inexpensive electric sit/stand model and I alternate sitting and standing, around 20 minutes sitting, or 8-10 minutes standing, and frequent breaks of at least 10 minutes every hour. You may not need or want a sit/stand desk but either way, you need a good stable surface to work at.
— Get a good ergonomic chair. Your hard dining chair or bench at the kitchen counter won’t cut it in the long term. Ergonomic chairs are available in good office supply stores and these days, don’t cost an arm and a leg. You should look for a version that’s stable with a five point swivel base, fully adjustable so your feet sit flat on the floor (or use a good footrest), has a seat base that comfortably suits your leg length, and a backrest giving good lumbar and neck support.
— Get an adjustable drawing board or easel. I found an old free A2 drafting board on Gumtree. It’s sturdy, large enough to take bigger pieces of paper and I can angle it to whatever suits me and the size of the work.
— Think about the layout of your materials and put them close at hand. I’m right-handed so I put all my tools on my right side where I can easily grab what I need without having to turn too much. I use a low flat container for my working pencils and tools, and my iPad is on an adjustable stand at eye height so I can see my reference at a glance.
— Think about your environment. I have good natural light but I also use a Neatfi LED light over my workstation to support the lighting conditions. Consider the temperature of your work location; it’s hot in Australia in summer so air conditioning is vital and no doubt central heating will be required in other locations.

The Kookaburras
#3 Tools
I use a raft of small tools in my drawing from a Slice knife for making whiskers or fur, a cosmetic brush or drafting brush to get rid of pencil dust, Tombow erasers for removing colour or making highlights, painters tape for masking off my work, cotton buds for blending, a kneadable eraser for making fine marks or general cleanup and a Prismacolor barrel sharpener because it fits neatly in my left hand as I work.
#4 Use good reference material
The key to getting detail in your work is having a clear high resolution reference. Without a clear, detailed reference, you’re left with making it up, and that’s fine if you’re confident with your skills but not everyone is. Because we draw what we see, or what we think we see, you can bet that with a poor reference image, the end result may not be the quality you’re looking for. You may need to use several references to get the details you need from the image.

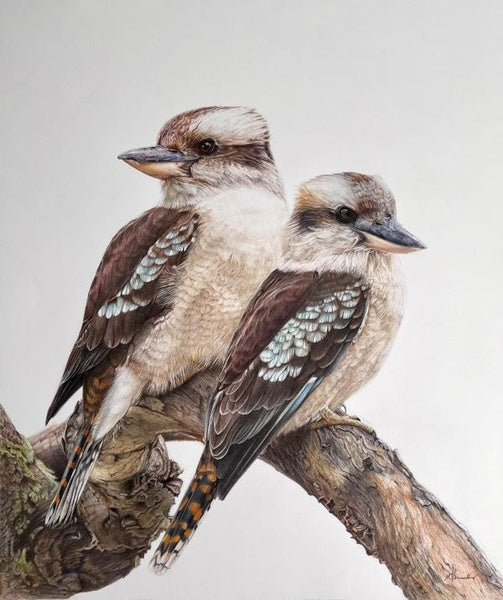
At Home with Carol and Charlie — 2023 Finalist in the Holmes Prize for Realistic Australian Bird Art
#5 Your drawing is more important than the colouring
A good base drawing is vital, and by that, I mean a good composition, and appropriately scaled and proportioned (big birds are big, small birds are small, trees look like trees, the components work in harmony with each other, etc). If the drawing isn’t structurally correct, the colouring won’t improve it and as coloured pencil takes a long time, you don’t want to waste it doing something that doesn’t work in the end. Get your drawing right!
Hopefully these tips give you food for thought. Questions or alternative tips welcomed.
Happy drawing!
Michelle Farmer:
Michelle lives in sunny Perth, Western Australia. She grew up creating art and although life took her in other directions, she returned to art as her family grew up. She loves capturing the essence of Australian nature, particularly birds, in coloured and pastel pencil, and watercolours. Her work is featured in online magazines, books, exhibitions, and personal collections, and she was a finalist in the 2023 Holmes Award for Realistic Australian Bird Art.
Instagram: https://www.instagram.com/michellefarmer_art/
Comments (1)
What kind of paper did you use?
Karen - Apr 16, 2024